센서를 아두이노에 연결해보고는 너무 허무해서 잠시 공황상태에 빠져 있었습니다. ^^
우선 DTH11에 대해서 알아 봅시다.
센서 제조사 홈페이지에서 우선 기본 적인 사항을 확인해 봅니다.
http://www.waveshare.com/temperature-humidity-sensor.htm
http://www.waveshare.com/wiki/DHT11_Temperature-Humidity_Sensor
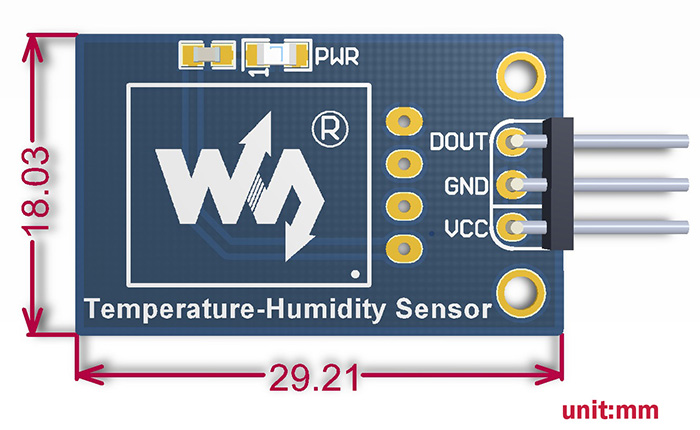
아두이노등과 연결하기 위해 PIN 연결에 대한 상세 정보를 확인합니다.


귀찮은 나머지 빵판 없이 바로 연결을 해 봅니다.
GND / 5V / DataPin 8 번과 모듈을 연결~
정상적으로 연결되면 모듈의 PWR LED에 사진처럼 불이 들어옵니다.

아래는 DataSheet 자료입니다.
Datasheet에 아래와 같이 데이터 자료 구조와 interface의 signal정보를 찾을 수 있습니다.
http://www.waveshare.com/w/upload/c/c7/DHT11_datasheet.pdf
◎Parity bit data definition
“8bit humidity integer data + 8bit humidity decimal data +8 bit temperature integer data + 8bit temperature fractional data” 8bit checksum is equal to the results of the last eight.
Example 1: 40 data is received:
0011 0101 0000 0000 0001 1000 0000 0000 0100 1101
High humidity 8 Low humidity 8 High temp. 8 Low temp. 8 Parity bit
Calculate: 0011 0101+0000 0000+0001 1000+0000 0000= 0100 1101
Received data is correct: Humidity:0011 0101=35H=53%
RH Temperature:0001 1000=18H=24℃
미리 예제 코드를 돌려서 Probe로 동작하는 pulse를 찍어보니 DataSheet 대로 나오고 있음이 확인 됩니다.

High 신호에 있다가 위의 그림처럼 18ms 시간 동안 Low로 DATA pin을 Host가 내려주다가 다시 High로 올려주면, 모듈단에서 Start signal로 인식이 됩니다. 위의 diagram에서 후반부에 많이 겹쳐 있는 시그널 부분이 40 bit data 전송 구간입니다.


0과 1의 구분은 High 로 올라간 신호의 길이를 통해 구분하는 것을 아래 Datasheet를 통해 확인 할 수 있습니다.
위의 diagram의 Data 0 와 Data 1 부분을 보면 실제 정의된 대로 신호가 출력되고 있음을 알 수 있습니다.

모듈 제조사의 홈페이지를 보니 친절하게 예제 소스 코드도 들어 있네요.
Datasheet에 정의된 시그널 대로 처리를 해주어야 값을 제대로 읽어 올 수 있습니다.


아래는 테스용 코드로 여기저기서 짜집기한 코드입니다.
필요하시면 참조하세요.
// sedew810225@gmail.com
const int DHTdataPin = 8;
int temperature = -1;
int humidity = -1;
void setup() {
Serial.begin(115200);
}
void loop() {
int ret = readDHT11();
if (ret != 0){
Serial.println(ret);
} else {
Serial.print("Humidity: "); Serial.print(humidity); Serial.println(" %");
Serial.print("Temperature: "); Serial.print(temperature); Serial.println(" C");
}
delay(400);
}
int readDHT11(){
uint8_t recvBuffer[5];
uint8_t cnt = 7;
uint8_t idx = 0;
for (int i=0;i<5;i++) recvBuffer[i] = 0;
// request sample
pinMode(DHTdataPin, OUTPUT);
digitalWrite(DHTdataPin, LOW);
delay(18);
digitalWrite(DHTdataPin, HIGH);
delayMicroseconds(40);
pinMode(DHTdataPin,INPUT);
unsigned int timeout = 10000;
// ACK
timeout = 10000;
while(digitalRead(DHTdataPin) == LOW){
if (timeout==0) return -1;
timeout--;
}
timeout = 10000;
while(digitalRead(DHTdataPin) == HIGH){
if (timeout==0) return -2;
timeout--;
}
// Read data for 40 bits
for (int i=0;i<40;i++){
timeout = 10000;
while(digitalRead(DHTdataPin) == LOW){
if (timeout==0) return -3;
timeout--;
}
unsigned long t = micros();
timeout = 10000;
while(digitalRead(DHTdataPin) == HIGH){
if (timeout==0) return -4;
timeout--;
}
if ( (micros() -t) > 40) recvBuffer[idx] |= (1<<cnt);
if (cnt==0){
cnt=7;
idx++;
} else cnt--;
}
humidity = recvBuffer[0];
temperature = recvBuffer[2];
uint8_t sum = recvBuffer[0]+recvBuffer[2];
if ( recvBuffer[4] != sum) return -2;
return 0;
}
'TinyProjects' 카테고리의 다른 글
| LCD1602 모듈과 아두이노 (1) | 2016.03.13 |
|---|---|
| HC-SR04 초음파 센서와 아두이노 (1) | 2016.03.11 |
| SEN0018 적외선 감지 센서 (0) | 2016.03.10 |
| ARDUINO/GENUINO 개발 환경 세팅하기 (0) | 2016.03.10 |
| Genuino 101 개봉기 및 센서 구경하기 (0) | 2016.03.09 |